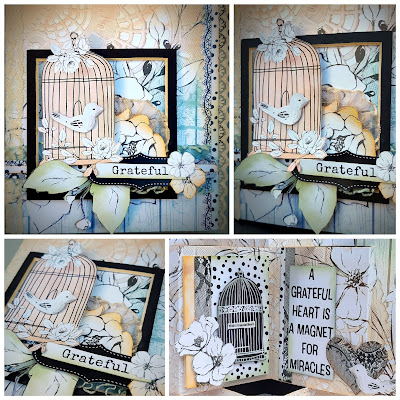
Hi to everyone. It's been exciting to create for Bee Arty with the beautiful Grateful Heart Collection this month. I have created 2 cards. The first is quick and simple for those who need a card in 20 mins and the second has a pop up 'book fold' centerpiece to add photos and messages as a special feature.
Card 1 - I have used a 5x7inch smooth white card base. To create this base cut a rectangle 7 inches high x 10 inches long. Score in half and fold to create your 5x7 base.
Cut the This Is Us decorative panel from the 'Family' 12x12. Ink the edges in a contrasting colour, I have used an orange shade. Turn sideways and attach to the front of the card base as pictured below.
Cut the String Leaves Die from the 'Hope' 12x12, the Cherish Every Moment sentiment from the 'Blessed' 12x12 and the Birdcage and foliage from the 'Gathers' 12x12.
Cut a mini rectangle, 1.5 x 4.5 inches from the 'Love' 12x12. Ink, center and attach over the top of the This Is Us sentiment.
Begin layering your String Leaves and Birdcage. Attach with 3d foam.
Continue by adding your Sentiment, again with foam, tucking the foliage around as pictured below.
Cut additional foliage pieces as you wish if you would like a fuller look.
Card 2 - This second card is a 6x6 pop up using the 'Faith' 12x12 as the base and pop up.
Cut your 'Faith' 12x12 in half horizontally.
The top half will become the pop up insert. Score, ink and fold the lower half to create the card base.
Top half. Measure, mark and repeat for each corner - 1 inch down from the top and 1 inch up from bottom edges then 2 inches in from the left and right sides.
Score a line vertically from the top marks to the bottom marks on the each side. Duplicate another set of vertical score lines 3/4 of an inch inside those score lines. When folded, this will create the depth of the 'book' area.
Cut a slit between the 2 marks horizontally along the top, then again between the 2 bottom marks.
Fold the score lines of the book section. The outer score being a valley and the inner score a mountain. Score and fold the center of the book in a valley fold.
On the top and bottom thin sections, mark, score and make a valley fold 3&1/8th inches in from each side then mark, score and make a mountain fold at the centers.
For visual effect I have added a piece of black cardstock to the center of the card base as it makes the book fold centerpiece stand out more. As a bonus it also adds strength to the card.
Cut a piece 5&5/8th inches high and 7inches long. Score and attach flat to the center of the card base.
Attach 2 strips of lace vertically along the inner edges of the base card.
Attach the book fold centerpiece 1/16th in from the left and right side edges.
You only need glue/tape on the flat section of the centerpiece, so make sure the book is clear.
Now you can decorate in whichever way suits. I have cut various, birds, birdcages, foliage, border strips, banners and sentiments to layer on the front cover and centerpiece. Add some colour to the black and white images to blend your project or leave black and white to contrast.
I have attached a border strip vertically to the righthand hand edge and wrapped a thick sheer lace over the spine then attached a piece of lace with border strips, 1&5/8th inches up from the bottom edge.
Once the base items are laid I have decorated the cover with the black frame, birdcage, foliage and sentiment layering it all with 3d foam and glue.
The book centerpiece has been decorated with sentiments and offcuts and on the left had side I have created a pop up flap for a private message, ticket or photo to go.
Happy Creating, Enjoy!! Katrina Thompson x


No comments:
Post a Comment