Wednesday, August 30, 2017

Boho Dreamer

Hello everyone. Today I am sharing with you a card using the new Bohemian Bouquet Collection designed by Denise Boddey. When designing this card I have focused on another colour variation in the beautiful palette that this range brings to you. You will see another of the new dies in action and also the beautiful chipboard designs that compliment this range along with a dash of hot foiling. I hope you enjoy.


Cut a piece of the Jungle, (green), cardstock to fit the Jungle Background Die. Attach a piece of the Die Cut'n Bond to the back of the cardstock ready for die cutting.

Once die cut, remove a portion of the inner floral section away from the frame.

Using the center doily from the 2 piece Fine Doily Chipboard Set and your Go Press and Foil Machine, I have coloured coordinated the doily with the patterned papers using the Pink Mirror Finish Heat Activated Foils.

Cut the lady and Hope sentiment from the 6x6 paper pad as pictured.

Blot the doily with white ink to give it a mottled appearance. Attach the lady to the Hot Foiled Doily. Dust the die cut with white ink to make it appear cloudy and cut a patterned matt, 10.5cm wide x 15.2cm high, from the 6x6 patterned paper as pictured.

 Cut a selection of the flower elements from the 12x12 patterned paper sheet as pictured.

Tuck the 'Hope' sentiment between the petals and leaves and mount with foam tape behind.

Card Construction: Cut a Snow White matt, 11.3cm wide x 16cm high and distress the edges.
Cut a Precious, (pink) card front 12.5cm wide x 17.5cm high. Ink the edges in white to soften. Cut an additional pink strip, 1.7cm wide x 15.7cm high, ink the edges in white and distress them.
Cut a Jungle, (green) card backing 15cm wide x 17.5cm high. Fold a 2.5cm vertical hinge down the left edge.
Attach the pink and green to form the card base. Overlap the green hinge, butting the pink edge into the fold. 

Attach the Snow White matt as pictured.

Center and attach the patterned paper as pictured. Attach the pink strip along the left edge and cut a 1cm strip from the 12x12 patterned paper to run through the middle.

 Peel away the backing from the Die Cut n' Bond and attach to the card base.


Attach the lady using foam mount tape. Arrange the flower elements around the image to complete.

Thankyou for Looking, Happy Creating!! K


Products Used:


Monday, August 28, 2017

Lady in Red

Hi everyone. Today I am sharing with you all the first of my projects using the stunning new range, 'Bohemian Bouquet' designed by Denise Boddey. I love the colour variations and design elements of this new collection and have a number of additional projects underway to bring to you soon.
With this project I have concentrated on using the 6x6 paper pad as well as incorporating the chipboard and dies. Although there are lots of little details and 3d foam, the depth is still minimal, easily slipping into an envelope.


Cut the small doily from the Bohemian Doily Set in 'Jungle'-Green cardstock and have dabbed it in a white ink.
  
                            Dab the Bouquet Doily Chipboard piece in a red ink, leaving it patchy.

                             Cut the Lady in Red and the 'Live' word from your 6x6 paper pad.


Cut the 6x6 patterned paper as pictured including the extended flower images from the bottom edge of the paper and the flower petals at the top. Cut out the red flower separately.

Layer the cardstock doily onto the chipboard doily. Centre the circular image from the lady print. Add the Live and the red flower using 3d foam.
 
Cut a strip from the 6x6 pattern as pictured and ink the edges in a green ink.

Over lap the two halves of the 6x6 that were cut earlier and edge them in red ink. Distress the edges of the green strip and attach the as pictured.
 
Using the decorative dies, cut a Curling Florette and a Curling Floral from the Jungle cardstock. Cut the Curling Floral into two pieces as pictured.

                                                Ink the tips of the die cuts in a red ink.

Create a card base from the Carnelian cardstock 17.5cm high x 25cm long. Score in half and ink the edges in white. Cut a Snow White mat, 16cm high x 11.8cm wide and cut and distress a Jungle mat, 15.7cm high 11.3cm wide. Layer the three to form the base.

                     Cut the three floral sections from the 6x6 patterned paper as pictured.

Attach the patterned piece to the card base and begin to arrange the die pieces and floral cut outs.

Attach the Curling Florette and the bottom half of the Curling Floral as pictured. Tuck in and attach the floral cut outs with 3d foam and embellish with Adhesive Pearls.

Attach the top piece of the Curling Floral die cut under the 'Live' panel as pictured and embellish with the Adhesive pearls. Attach the floral cutout on top of the Live with 3d foam.


                                         Thankyou so much for looking, happy creating!!

Products used:
ULT158031 Bohemian Bouquet 6x6 paper pad.
ULT158058 Curling Florette Decorative Die
ULT158064 Curling Floral Decorative Die
ULT158074 Bohemian Doily Die Set
ULT158368 Bouquet Doily Chipboard
ULT20001 Snow White cardstock
ULT200068 Carnelian Cardstock
ULT200038 Jungle Cardstock
CO724637 Perfect Plum 3mm Adhesive Pearls
CO724641 Grass Green 3mm Adhesive Pearls
CO725376 2mm Premium Adhesive Pearls


Friday, August 11, 2017

Fun with Foils

Hi everyone! Katrina here with you today, showing you a few more colour combinations with the fabulous colours in the Hot Foil range. Once again, a three colour combination really gives you a great effect. Playing with the same Hot foil stamp, I have foiled on both cardstock and ribbon, combining the pieces to create an alternate design to show that our options are endless to create with.

Pinks, Golds and Silvers combine for this card.

                                   The light catches it to create so many pretty variations.

Separate the flower petals and attach each petal to a layer of Die Cut n bond. Cut to the shape of the petals and peel away the outer layer ready to foil.

Cut small portions of the Pink and Gold Mirror foils and Silver Iridescent Foil. A little goes a long way. Dab and lift in a random patterns over the 3 petals until you achieve the desired mix of colour.

Layer your petals once again and slip a few stamens through the centre to recreate your altered flower.

Create a 14cm square card from the Matte Gold Lines Mirror Foil Board. Cut a 12cm square from the Cherry Cola card and a 9.8cm square from the Snow White card. Run an even layer of double sided tape around the edges and apply the same dabbing technique as with the flower using the Pink, Gold and Silver Mirror finish foils.

Cut a 10cm square from the Matte Gold Damask Mirror Foil Board. Hot Foil onto the square with the Curling Motif Hot Foil stamp in Silver Mirror Foil. Cut the panel down to a 9cm square, cutting around the circular ends to create a feature. Use the central design of the Hot Foil stamp, foil onto the length of ribbon with the Gold Mirror Foil.

You will now have your card base, edged pink layer, edged white layer, Curling Motif on both card and ribbon and your flower.

Attach your pink layer flat to the Gold card base. Attach the Curling Motif to the white layer. Turn your ribbon horizontally and wrap over the edges, creating a full medallion, as pictured and secure on the underside. Attach this layer with 3d foam to the base, then attach the flower, centred on top.


                   Thankyou so much for looking, until next time, Happy Creating!! K x

Products Used
CO725296 Anna Griffin Curling Motif Hot Foil Stamp
CO725405 Mirror Foil Board Matte Gold Damask
CO725407 Mirror Foil Board Matte Gold Lines
ULT157644 Die Cut n Bond
ULT200070 Cherry Cola Cardstock
ULT200001 Snow White Cardstock
CO725359 Pink Mirror Finish Heat Activated Foil
CO725353 Silver Iridescent Digital Finish Heat Activated Foil
CO725350 Silver Mirror Finish Heat Activated Foil
CO725385 Gold Mirror Finish Heat Activated Foil


Wednesday, August 2, 2017

Snowflakes with Foils

Hello and Welcome back. Katrina with you today and I am sharing a few alternative ideas using the new heat activated foils from the new Go Press and Foil Machine range together with the beautiful new range of Dies from the Let Every Day be Christmas collection.
This is something everyone can do whether you have the new Go Press & Foil Machine yet or not.
All you need are your standard cutting dies, the heat activated Foils and the very handy, Ultimate Crafts - Die Cut n bond adhesive and your options are endless.
This is also something very easy that I have found the kids enjoy also and we have step by step photos to show you how.


                           As the different light catches your foils you will see beautiful effects.

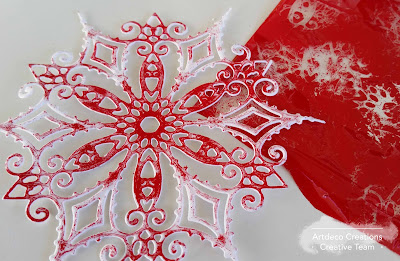
Cut your Die Cut'nBond to fit your Die shape and adhere to the top side of your cardstock. I have used the Snowflake Doily Die with the Snow White cardstock.

Gently peel away the top protective layer so you are left with the sticky bond ready for your foils.

Cut a small piece of foil. A little goes a long way. With your coloured side up, gently tap the underside, lift and repeat either randomly or in specific spots. I have started with the Red Matt foil.

3 colours gives a nice mix, so being inspired from the colours in the Let Every Day Be Christmas range, I have also used the Blue-Green Iridescent and the Blue Mirror Foils.

              Continue to tap on your colours until there are no sticky areas left on your die cut.
 
Create a square card base, 15.25cm (6inches), from the Caruso Cardstock.
Cut a matt from the Mirror Foil Board - Silver Lines design, 11x14cm.

Cut a panel from the Christmas Baroque Background Die in Garnet cardstock.
Cut a Merry Christmas and Snowflakes Mini Die set, Snow White cardstock using Die Cut'nBond.

 I found separating the decorative panel elements from the die and using them as side strips on the silver panel complimented the snowflake centrepiece.

Attach 2 matching red strips to either side of the silver mat and attach the piece to the card base.

Separate the Merry and Christmas, then apply the same foiling technique to each piece.

                                        Attach the snowflake to the centre of the card front.

                                       Add Couture Creations, 'Crystal' Adhesive Gemstones.

                                   Attach each of the Die Cut elements to balance your card. 

     Dab some Red Glitzin'Glamour to the Decorative borders to give them some shimmer.


                     I hope you enjoyed todays tutorial, until next time, Happy Creating!! K x

Products Used:
CO725513 Snowflake Doily Die
CO725509 Merry Christmas Decorative Die
CO725515 Christmas Baroque Background Die
CO725521 Snowflakes Mini Die
Heat Activated Foils, Red Matt, Blue Green Iridescent, Blue Mirror - Go Press and Foil Machine
ULT200001 Snow White Cardstock
ULT200030 Caruso Cardstock
ULT2200067 Garnet Cardstock
CO724156 Crystal Gemstones
CO721979 Red Glitzin' Glamour